Disney Dark Ride Photography Tips
Photographing dark rides at Walt Disney World and Disneyland is tough, but with these tips, you should be able take great on-ride photos! This guide will help you improve your photography on the toughest dark rides like Haunted Mansion, Peter Pan’s Flight, and Pirates of the Caribbean.
There are a lot of great reasons to get into dark ride photography. First, it’s a fun challenge that adds a lot of re-rideability to many attractions as you want to keep going back to get that perfect photo. Second, it’s also a great way to spot details that are very difficult to see with your eyes.
My favorite discovery photographing dark rides has been the various brands of booze Imagineers made up to put in the Saloon scene of Phantom Manor; these bottles are impossible to read with the naked eye! Finally, it’s a great way to document your favorite attractions and see how they change over time (or disappear completely), so you can relive your memories on them years later…
For me, the challenge is mostly what it’s about, as I love competition, even if it’s only with my past “benchmarks.” As I’ve been able to conquer the “easier” dark rides, I’ve tried the faster-moving ones. My greatest “conquests” so far have been the Carnotaurus on Dinosaur at Animal Kingdom, and the Lava Monster on Journey to the Center of the Earth at Tokyo DisneySea.
While this article focuses on dark rides, most of the general advice here can also be applied to stage shows like Country Bear Jamboree and Carousel of Progress. Just be careful not to get yelled at on the latter, as Cast Members constantly change the photography ‘rules’ there!
If you’re ready to learn how to take better photos on Disney attractions and rides, let’s get started!
Actually…before we get started, I’ll put my most important piece of advice right at the beginning. TURN OFF YOUR FLASH ON DARK RIDES. It doesn’t matter whether Cast Members inform you it’s the rule or not. Turn it off. Not only is it rude to other guests because your flash destroys the illusion that the Imagineers created with carefully considered show lighting, but it makes your photos look like garbage for the exact same reason.
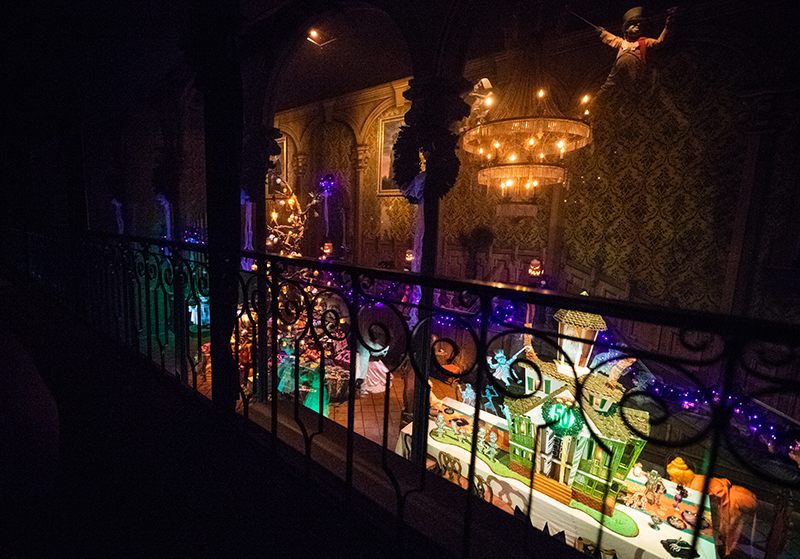
Why would you want to replace this brilliant and moody show lighting with the washed out look created by an on-camera flash?! Inability to take good photos on a dark ride without the flash is no excuse for using it and ruining others’ experience. If taking good photos without the flash is problematic, there’s this magical place called the internet, where thousands of other people have uploaded photos with Creative Commons licenses!
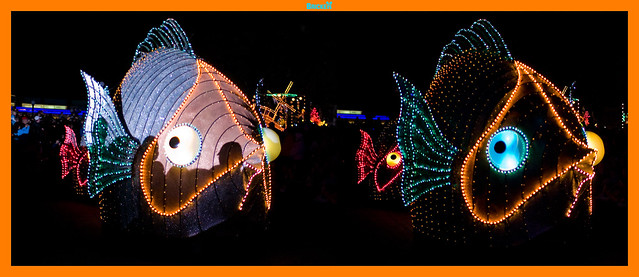
Your family isn’t going to be in these photos anyway, so it doesn’t matter if you use someone else’s photos! Same applies with night parades. If you wonder why this is such a big deal, check out the two-photo comparison above. My photo on the left captured someone else’s flash, my photo on the right was .25 seconds later, without any flashes captured. Quite the difference, eh?
Sorry (not sorry) for the tone of that last paragraph. The good news is that you have no reason to be offended if you don’t blatantly disregard ride rules and etiquette! If you didn’t know any better, consider it a learning opportunity–many of us have made the same mistake so there’s no reason to feel bad. If you did know better and just don’t care about others, I don’t really care if I offended you.
With these pleasantries out of the way, let’s turn our attention to how to better photograph Disney dark rides with point & shoot cameras and DSLRs!
Point & Shoot
The unfortunate news if you have a point & shoot is that many rides are going to be flat out impossible for you to photograph. The really dark attractions like Haunted Mansion and Peter Pan’s Flight probably are out of the question. You can try them, but unless you have a camera like the Sony RX-100, or another fancy point & shoot, chances are you’re wasting your time…or at the very least will end up with a lot of blurry and a lot of noisy photos, and maybe one or two lucky shots that look good.
The good news is that not every ride is this dark. Rides like ‘it’s a small world’ and Spaceship Earth have some brightly lit scenes, as do several other dark rides. If you’re a non-photographer, you may not think about lighting a ton, but if you pay closer attention, you should notice some brighter scenes–and those are where your best opportunities lie.
If you are a point and shoot photographer who is comfortable with semi-manual settings like(and you have a camera capable of them), skip down to the DSLR section. The tips there will generally apply to you, just keep in mind the equipment limitation of using a point & shoot.

If you’re not comfortable with semi-manual settings, but are willing to learn a little, I’d recommend putting your camera into aperture priority mode (“Av” or “A” on most cameras, if they have it), changing your aperture “f/number” to as low of a number as you can, and adjusting your ISO to the highest or second highest number possible. Test this now by starting with the highest number and taking a photo in a dimly lit room. If the photo looks acceptable to you in terms of noise, use that ISO. If it’s too noisy, go with the next lowest ISO number.
If you’re not comfortable even with the above (that’s your best option, so I highly recommend learning how to do that–it might sound complicated at first, but it’s fairly easy), then I recommend putting your camera into sports mode or kids and pets mode, or some other auto mode that has a name that involves things that move. You will most likely end up with a lot of grainy, dark, and out of focus photos on the dark rides that are especially poorly lit, but you might end up with some good shots, too.
In general, try to avoid zooming when photographing scenes in dark rides, as that decreases your likelihood of capturing good photos. Also, when possible, photograph subjects as you approach them straight-on (a front row seat in boat rides is your best option) rather than as they move past the side of your ride vehicle.
Your best option for photos will be when something bright is in the center of your LCD screen, at which time you should halfway-depress the shutter button to focus, and then fully depress once the camera has focused. As mentioned above, make sure you turn off your flash, but also make sure you turn off “auto-focus assist” or any other external lighting that helps your camera grab focus.
DSLR
Before we dig into this section, it’s important to know that we’re in intermediate territory here, so it’s important that you have a good grasp on the three elements of exposure, and how to manually adjust settings on your camera. If you don’t have basic technical understanding of the elements of exposure (shutter speed, aperture, and ISO), read Understanding Exposure by Bryan Peterson before reading any further.
If you lack an understanding of how to manually adjust settings on your camera, read its manual (or better yet, one of the intuitively-written Magic Lantern Guides).
DSLR Equipment
For most of these rides, there’s another thing you’re going to need beyond just knowledge, and that’s equipment. Few types of photography in the Disney theme parks are equipment-prohibitive, but dark ride photography is one such type. You will need a “fast” lens, and by that, I mean a lens with a minimum aperture of f/1.4 or f/1.8. If you have an f/2.8 lens, that will work, too, but you’re starting to push it (and chances are, if you have an f/2.8 zoom, you have a less-expensive f/1.8 lens).
The most common lens I see people recommend for dark rides is the 50mm f/1.8. Canon has one of these, as does Nikon, and the other manufacturers do, too. This lens gets recommended a lot because it’s only around $100. I do not recommend it for dark rides (unless you’re shooting full frame). The reason I don’t recommend this lens is that for most show scenes, it’s going to be too tight. In most situations, you want a lens that provides pretty much the same field of view as your eyes.
The 50mm f/1.8 lenses are designed to provide this field of view, but they are designed to provide it on a full frame camera. With a crop sensor camera, they provide what I feel is an awkward, no man’s land, field of view. You can work with this limitation and use them to great success when you’re able to “zoom with your feet,” but you can’t zoom with your feet in dark rides…unless you plan on getting out of your vehicle. (Sadly, Disney no longer is cool with folks like the Mesa Verde Times.)
Instead, if you’re shooting with a crop sensor DSLR, I recommend something in the 28mm to 35mm range. My top pick here is the Sigma 30mm f/1.4, which was my go-to dark ride lens before I moved to full frame. Check out my review of the Sigma 30mm f/1.4 here. I know Nikon has a budget 35mm f/1.8 lens that might tempt many of you, but I highly recommend spending a little more for the Sigma. It’s a better lens overall, and is much better for dark rides. For full frame shooters, I think those 50mm f/1.8 lenses are great options.
DSLR Settings
As for settings, you want to shoot in raw and use auto white balance. Several years ago, raw v. JPEG (note: raw is not a format or an acronym, so it’s “raw,” not “RAW”) was a big debate on the internet. This debate is so pointless that it’s not even worth addressing. If you are a dinosaur who still believes JPEG is somehow superior (thanks for reading, Mr. Rockwell), have at it.
Use auto white balance because you can set it in post processing, and it’s too difficult to change on the fly as most dark rides have dynamic lighting. As for metering, put your camera in spot metering (Nikon) or partial metering (Canon). This is the metering mode that takes the very center of the frame, rather the whole scene or the center-average.
Since you’re photographing scenes that will have heavy lighting on specific focal points but dim lighting on the rest of the scene, you want to meter off of those bright spots (which will be your subjects, too), and not average that metering with the dark areas behind them. If you stay in the default metering mode, the portions of your shots that matter the most will be overexposed messes.
In addition to this, on most dark rides, I adjust my exposure compensation into the negative–from -.7 all the way to -1.7. This serves two purposes: it keeps my ISO lower and/or my shutter speed faster, and it’s easier to brighten shadows in post processing than it is to recover blown highlights.
You’ll also want to adjust your focusing mode to servo (Canon) or AF-C (Nikon), which will ensure that you’re continuously focusing. Your ride vehicle is moving, as are the Audio-Animatronics, so you want to be tracking focus on those movements.
Another option, and this is seriously advanced territory, is using manual focus. I do this from time to time, and it’s difficult. It’s nearly impossible to actually nail manual focus on a moving ride in the dark, but switching into manual focus is a good makeshift solution if you find that your lens hunts and hunts for focus, but rarely achieves focus.
In many dark rides, each scene is about the same distance from your vehicle. Once you’ve successfully nailed the focus for one scene, you might be able to leave the focus alone for subsequent scenes.
The problem with this is that not all scenes are the same distance, so you will most certainly end up with out of focus photos for entire scenes if you do this. My preferred method when using manual focus is to hold my shutter button down while going through a scene, as I slowly turn the focus ring back and forth in the general range of where it should be.
I only do this if the scene is really important, and I might end up with 40-50 shots from one scene, at least 75% of which are pretty much guaranteed to be out of focus, but even then I still have a few shots that are in focus. That’s a few shots more than you have if your lens keeps hunting and you aren’t able to take any photos!
As for exposure settings, I like to go with aperture priority with a wide open aperture (f/1.4 or f/1.8 depending upon the lens), with auto ISO enabled. I then set a base and a minimum shutter speed. Some people recommend shutter priority mode or manual mode instead. If you have a Canon DSLR, you may not have the option of auto ISO with a minimum shutter speed.
Instead, shutter priority or manual mode may be your only option. If you do use shutter priority or manual mode, I recommend a shutter speed of between 1/30th and 1/50th of a second. You’ll end up with some blurry photos using these shutter speeds since they’re a little on the slow side, but they will help keep your ISO down.
Likewise, for the minimum shutter speed if you’re using auto ISO, I recommend 1/30th to 1/50th. Same reasoning and results apply. As you get more comfortable shooting and more knowledgeable, you can get outside of this zone depending upon the ride you’re photographing. For example, I typically use 1/15th of a second during some scenes of Haunted Mansion, but bump it up to 1/80th of a second during some parts of Peter Pan’s Flight.
For minimum and maximum ISOs, go with the minimums and maximums your camera allows. This will probably be ISO 100 or 200 on the minimum end, and ISO 3200 or 6400 on the maximum side. Dark ride photos will have varying degrees of noise no matter how nice your gear. That’s just a fact of life.
If you take 100 shots on a ride-through with the settings I have suggested here, expect at least 50 to be garbage for various reasons. If you used more conservative settings, you might end up with only 25 that are garbage. However, with my suggestions, the ones that are good will have less noise and more detail than the ones captured using more conservative settings. Personally, I’d rather have 5 very good photos than 50 okay ones, but that’s just me. Your approach when shooting dark rides should be all about quantity and percentages–the more photos you take, the greater the likelihood that you’ll end up with some great ones. In any case, you are only going to end up with a handful of good to very good photos on each ride-through, with the vast majority being trash. This is normal, so don’t be discouraged by it!
Post Processing
![]()
Your post processing on most dark ride photos will be fairly minimal. The big things here are noise reduction and getting the colors right. You can add your own post-processing wrinkles, like contrast and black level adjustments. You’ll probably want to increase the brightness or exposure if your shot is underexposed, and you’ll also probably want to adjust the recovery, which tames highlights that will likely still be a bit too bright.
This is one instance where I don’t mind a vignette (the Sigma 35mm f/1.4 I use has a great natural vignette wide open, but you can also add one in post processing), because it’s usually not noticeable since the edges are usually dark, and it can conceal noise. Be aware that any “over the top” post processing is going to really draw out the noise in the photos, so don’t bust out Photomatix or any other tone-mapping programs, unless you have a specific, artistic goal in mind.
For noise reduction, I don’t have any special tricks here. I just use Adobe Camera Raw’s built-in noise reduction sliders. Adobe Camera Raw uses the same processing engine as Lightroom, so if you have that, use its built-in noise reduction. Adobe has made serious strides in noise reduction in recent releases. A lot of people used to use separate plug-ins for noise reduction, but now I’d say Adobe is the best in the game.

As for adjusting the color…good luck! The first step will be adjusting white balance and tint. This will be done to taste, and with Disney dark rides, usually means going with a cooler white balance. One thing to consider here is whether you want your photos to appear true-to-color or true-to-lighting.
Many of these attractions have very deep lighting that masks the actual colors of the Audio-Animatronics and environments, and you can choose to either show how the Audio-Animatronics and scenes would look in the absence of such lighting, or you can embrace the lighting and leave a bit of color-cast on your photos. I tend to go somewhere in the middle, as I think true-to-lighting makes the photos look overly flat, and true-to-color doesn’t accurately represent what you’d see while riding an attraction, since you do see its lighting.
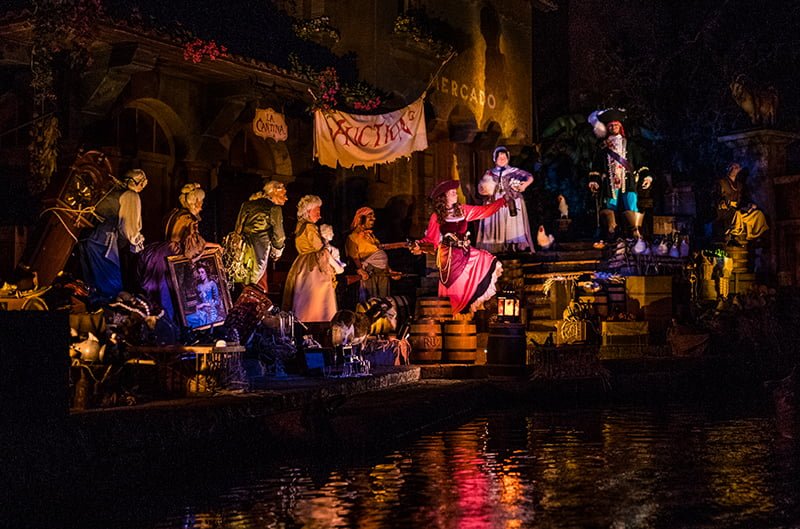
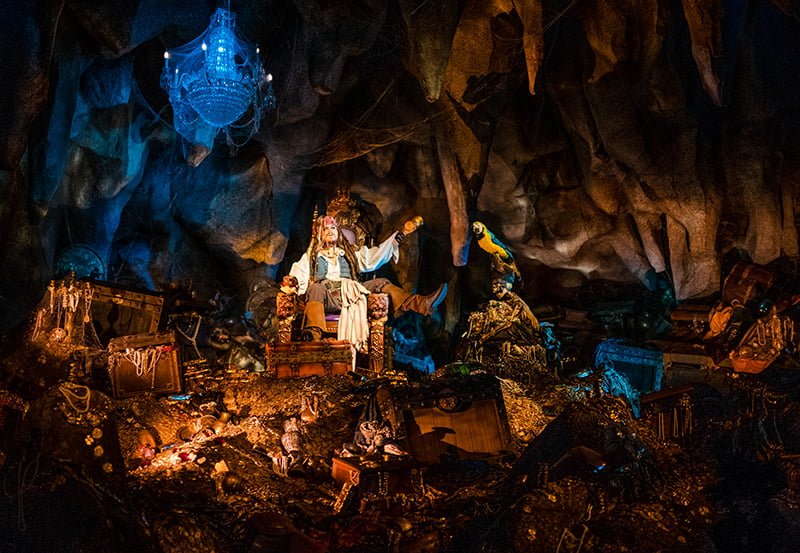
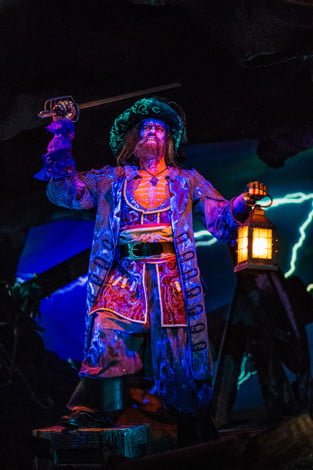
Beyond adjusting white balance and tint, you might find yourself adjusting the saturation and intensity of individual color channels. The prime example of this is on Pirates of the Caribbean. Pirates has moody orange lighting in most of its scenes, and this lighting wreaks havoc on DSLR sensors.
Your raw files will be much more orange and red than the eye would see, and the best way to address this–even better than adjusting white balance–is to de-saturate the orange and red channels of the photo. Not completely, but to the point where you don’t have an orange mess. You might also consider adjusting the balance of various colors (I sometimes do this), but this is another “salt to taste” type thing, so there’s no since in me offering specific advice. Just tinker with the sliders until you have something you like. Over time, you’ll learn what works and doesn’t work for each dark ride.
Getting Creative
While I love the challenge of photographing dark rides, one of my biggest “beefs” with them has always been that it’s much more difficult to get creative when photographing dark rides, and I think photography is all about creatively. (I view regular dark ride photography as more of a sport than an art.)
Creative dark ride photography is one of the most challenging types of photo you can take in the parks, since it combines the inherent challenges of photographing dark rides mentioned throughout this article, and also throws “being creative” into the mix, which has its own set of challenges.
There are a number of ways to get creative with dark ride photography, but I think the best are using atpyical lenses, trying longer exposures, going abstract, or trying to incorporate people in the photos. I’ve found that this is easier accomplished with shows than it is dark rides, but it can be done on both. This is still very much a work in progress for me, but I love the results I’ve had thus far.
Overall, dark ride photography is something that challenges a lot of people not because they don’t have the knowledge for it, but because they don’t have the equipment for it. If you want good dark ride photos, the unfortunate reality is that you most likely will have to have the equipment for it. Equipment, alone, is never enough when it comes to photography, and hopefully the tips I’ve shared here will help you put your equipment to good use. Just remember that the majority of dark ride photos even the best photographers take go directly to the trash, and your chances of great photos increase with the more photos you take. Good technique is important, but so is luck!
If you’re interested in improving your Disney photography, check out a few of my top photography blog posts:
Photography Buying Guide: Everything from Underwater Cameras to Software
Best Books for Improving Your Photography
5 Indispensable Tips for Better Vacation Photos
Choosing the Best Travel Tripod
Choosing the Best Camera Bag for Travel
For trip planning tips and comprehensive advice, make sure to read our Walt Disney World Trip Planning Guide and Disneyland Trip Planning Guide. For updates on Walt Disney World, the latest news, discount information, and tips, sign up for our free monthly newsletter!
Your Thoughts
Have you tried photographing dark rides at Walt Disney World or Disneyland? Which rides are your favorite to photograph? Which ride is your “white whale”? Any other tips you can offer? Hearing from you is half the fun of these articles, so share your thoughts and any other tips you might have in the comments!
Hi Tom,
I wanted to get some feedback. Im in the market for a new lens specifically for an upcoming disneyland trip. I was thinking of getting the Nikon 50mm f/1.4 for my nikon d7000. I read about the sigma 30mm f/1.4 and cant figure out which one would be better for shooting rides, etc. In your opinion, which lens would lead to overall better images. Or some info on what would be good to shoot with each lens. Any feedback would help!!!!! Thanks
Without a doubt, the Sigma 30mm f/1.4. Better overall lens, and more useful focal length for dark rides.
I have a Canon 70D with a Canon EF-S 17-55mm f/2.8 IS USM Lens. It’s f/2.8 all the way through the zoom. I know it’s pushing it but it does take fantastic pictures on this 1.6 crop camera.
Would you recommend trying to go lower like f/1.4 or f/1.8?
Hello and thanks for all this info on your site! I’ve been reading it for days and gaining quite a bit of info as to how to photograph WDW. Let me state that I have been going to Disney in Florida since ’71, and have been several times over the years.
Your photography is some of the best I’ve seen of the parks, and I enjoy reading your tips. To achieve the night shots with no people in them I notice you either shoot over them (great tip!) or stay past closing. So how late can you stay past closing? And do they chase you out? Do they let you set up a tripod after hours and take a few shots?
I thought I was going to look crazy walking around Disney with a Lowepro flipside 400 and a tripod, but I see now I am not alone! In that pack I will have a Tokina 11-16 2.8, Nikkor 35 1.8, Nikon 50 1.4, Nikon 7100, SB600, and assorted cards and batteries. So I was thrilled to see your well-worn bag stuffed to the gills! I am in the market for a zoom, esp. for this trip, and have zeroed in on the 18-200, also Nikon, hopefully have the cash in a few weeks, as we are going in April.
After reading even further I was pleased to see you suggest shooting in raw, which I do, but was reluctant to do so for a while, but the results in post are well worth it, just pack extra cards! I’ll go a bit further with it and say I shoot in Adobe color, as it allows a bit more in post, I think, anyway. But all that is getting into it a bit much for the average Disney traveler, let alone first timers who just want some good shots to go home with. (I also can’t believe you called Rockwell a dino!) Lol. Does he read your stuff?
If you ever want a partner to go into business with doing Dinsey photo tours, call me!
Best wishes, and keep up the excellent work! I love your shots!!!
One problem that has come up from time to time when shooting in dark places is that I’ll have the flash off, but there is still a light on the camera that shines a bit when I take the picture. Consequently I’m sometimes perceived as taking flash photos when I’m not. How do I make the light less distracting in no-flash photos?
21 days until my first Disney trip with my fancy new DSLR. I feel like I should take notes on this post!
I bought a Canon SX50HS, but Im having trouble with dark rides and the paredes. Using the AV, I put on the last ISO and to take faster pictures, but I erase about 95% of the pics. Any tips?
Your equipment is inherently limiting, unfortunately. See the section on equipment for more info.
Julio Tom it right. You’re not going to be able to take any low light pictures with a point and shoot camera without a flash and as Tom pointed out the flash will make the picture look horrible in a situation where lights are used to enhance the scene (i.e. a ride or Disney parade).
The cheapest camera that can do something like Tom is describing would be a 4/3 camera like a Panasonic GH-3.
Another etiquette tip that recently learned myself is to shut off or cover my DSLR’s display while on dark rides. My camera has an ambient light sensor that’s easy to cover to get the screen to shut off, so that’s what I do. Otherwise that thing can be pretty bright and it’s not the mot obvious thing to realize (unfortunately, I only realized it on the 2ND or 3rd ride. Sorry to anyone I annoyed. 😞)
Excellent article! Appreciate the rough baselines to start with in terms of shooting. Always good to see what other photographers are doing. Thanks!
Great article! Biggest takeaway for me was the metering mode. I never thought to change it to spot. Gotta try that the next time I go.
Metering mode is huge–if you don’t change it, you’re likely to end up with a lot of blown out faces!
You are truly talented! I love visiting your blog just for the pictures sometimes. Makes me feel like I am there.
Thanks for sharing!
Thank you for the kind words!
Hey, you made buzzfeed! http://www.buzzfeed.com/justinabarca/types-of-people-you-see-at-disneyland
I heard you were in Magic Kingdom last night too! I was taking photos a Winnie the Pooh and a cast member asked me if my name was Tom? I said no and walked off. A few steps away I realized who they were talking about so I went back and talked to her. She said her room mate is a fan. I am the one that met you in Japan on Saturday. Thanks for all the great tips and photos!
We weren’t in Magic Kingdom last night…already on the way back home to Indianapolis by then. Funny that someone asked if you were me. Nice meeting you at Epcot–hope you got some good shots!
Hey…. Were you at magic kingdom today?
I really enjoy all your photography articles! Very much agree about the flash. I rode behind someone on Pirates one time and it was “flash, flash, flash” I pretty much was considering throwing them in the water by the end of it.
I’m not entirely sure about this, but I think they’ll give you a congratulatory button at City Hall for doing that. Something about “I Performed a Public Service!” 😉
Tom, what are your thoughts regarding iPhone photography on dark rides? I started to take some iPhone pics on a dark ride at WDW when we were there a few weeks ago, but quickly stopped when I realized the lit-up screen was probably distracting to other riders. Just curious because you didn’t mention it above – thanks!
If done discretely, it can be fine. Sarah takes iPhone photos on some dark rides, and the big thing is turning your screen brightness WAY down before the ride, and keeping the screen close to your chest so it doesn’t distract others. If those two things are done, it’s not issue. However, that’s not how most people do it.
The bigger problem is that the iPhone just doesn’t have the sensor for dark ride photos. At least 95% of photos taken on a dark ride with an iPhone will be awful.
Good tips, thanks! And yes, the few pictures I took were fairly terrible. 🙂
Do you do the same with your DSLR screen? Do you still chimp on the dark rides?
PS – I’m in LOVE with your site! Just bought our APs this weekend & I’m so looking forward to going on a regular basis.
I usually do not review images on dark rides unless there’s no one behind me who will be affected. Even then, I still typically don’t review. Many times this has led to entire ride-throughs of useless photos, as I forgot to change a critical setting before the ride!
You could have stop after your first point and I would have been happy. If there’s one thing that simply ” kill ” me when I try to take picture or simply experience an attraction at night or inside ( dark ride ) is seeing someone use a flash. Not only is it useless ( flash actually work better most of the time in daylight ), it’s also incredibly annoying for the others guests around. So thank you if you managed to get some people to stop using those.
I do find it humorous that most people in auto mode do use the flash to photograph things like fireworks, but not during the day for portraits to eliminate unflattering shadows.
For those with a point and shoot, check your scene settings. Mine has a low light feature that takes great night and dark ride photographs.
I’m surprised that a low light mode would work in both situations. Night landscapes and dark rides call for very different settings. Landscapes should have longer exposures to allow more light to hit the sensor. Dark rides need faster shutter speeds and higher ISO. My guess is that the mode just raises the ISO and keeps the shutter speed at acceptable handheld speeds–it’s really not the ideal mode for night landscape photos if that’s what it’s doing!
Thanks for mentioning the flash thing – it really does affect the experience for everyone on the ride. On our last trip, we rode The Great Movie Ride with a guy in front of us taking flash pictures. Even after the cast member said very clearly that no flash photography was allowed, he continued to take pictures through the entire ride – it was a great distraction, and really took away from the ride! I’m glad we got to ride it again later, without flash! I understand wanting to take good pictures, and have great memories, but don’t ruin it for everyone else!
Yeah, it can ruin a ride. It’s frustrating for me, and we go regularly so it’s not a huge deal if I have a single ride ruined. I can only imagine it being a once per year trip, waiting in line 30 minutes for something, and then having the ride ruined.
I’m sure some people don’t appreciate the tone of that paragraph, but that’s why it’s so strongly worded. It’s a really big problem, and should only offend those who blatantly disregard the rules. Those who don’t know any better will hopefully learn from it!
I have taken pictures inside with only a sony digital camera. As I only took a few with the flash, and I sat at the back I didn’t bother anyone. I later edited it for hours on the computer with great success. Well I like them anyway.
But I want to publish them along with other pictures and don’t know if I can yet.
My biggest challenge with dark rides is generally to get the color right in post processing. For POTC, no matter how I adjust the white balance I tend to get very red/orange cast pictures that don’t represent the true color of the ride.
Here’s a great tip for amazing Peter Pan’s Flight photos- have the ride break down several times during your “flight.” I’ve managed to get some awesome shots that way =)
One dark ride I find to be ultra difficult to photograph is Alice in Wonderland at DL!
I agree on Alice in Wonderland. The only worthy picture of that, it’s a really blurry picture of Cheshire cat’s eyes and I only like it because it looks really off-kilter, kind of grim and other dimension-y. The first and only time I tried photographing the ride, I think it gave my DSLR a small seizure.
Alice in Wonderland is deceptively difficult to photograph. The easiest scene to shoot is the “tea party” at the end–and only if you’re in the front row–because your ride vehicle moves straight towards it. Focus your energy on that scene and you should get a keeper!
Greatly enjoyed reading this artile. I keep trying to photograph dark rides with not the best of luck. This puts some insight into a great starting point for us new to the DSLR thing. I also liked that you included the post processing info as well. More of post processing stuff to come? I would like to know some easy/basic things that you suggest to improve the processing. Keep up the great work!
Post processing is probably beyond the scope of this blog because it varies for me with each photo. I do post my post processing steps when I share photos on my travel blog, http://travelcaffeine.com