How to Photograph Fireworks
In honor of this weekend’s Independence Day holiday (good luck to everyone braving the crowds at Walt Disney World!), this post offers a how to guide for photographing fireworks! This is one of the most intimidating types of photography to beginners, but it’s really easy to learn once you understand the basics and spend some time practicing and learning via trial and error. This post will walk you through the process of photographing fireworks from beginning to end. While these fireworks photography tips are geared towards Disney fireworks shows, they are equally applicable outside of the parks. (So, go nuts at your local July 4th fireworks show on Monday!)
One of the reasons why fireworks photography probably seems so challenging is because equipment poses a barrier to entry. Perhaps you’ve tried photographing fireworks in the past, but did so while holding your camera by hand. While this is possible, it’s a far from ideal way to shoot fireworks, and that might have been borne out by your images.
Equipment, mainly a tripod and remote, are the big secrets to fireworks photography. Really, they’re no secrets at all. A lot of photographers know these pieces are near-essential, but they aren’t willing or able to use them due to inconvenience or impracticability. (I recently encountered such a situation at Shanghai Disneyland, and had to make due with handheld shots–not what I wanted, but with improving technological, more usable in a pinch than it was a few years ago.)
Before the tripod and remote, the first thing you will need is a camera with manual mode, capable of being operated with a remote. Basically, this means a DSLR, mirrorless interchangeable lens camera, high end point & shoot (like–my favorite–the Sony RX100), or whatever the kids are using these days. Fortunately, these tips will not work with an iPad, so just go ahead and put that in your fanny-pack.
Next up is the tripod. Here, the taller, the better. Well, within reason. You don’t want some gargantuan contraption that will get flagged by security on your way into Magic Kingdom, Epcot, Disneyland, Disney’s Hollywood Studios, etc., and you also don’t want something so tall that your camera is a de facto shoulder child that will catch the ire of guests behind you. I find my beloved Velbon Luxi L III tripod to be the perfect height (64.5″) for fireworks photography, and would say that something in the 60-72″ maximum height range is ideal.
The remote you should get varies depending upon the camera you’re using, so I can’t really offer specific suggestions. Well, with one exception: never buy a first-party remote. (Unless you also like lighting cigars with c-notes.) They’re way overpriced and don’t do the job any better than the knock-offs. I always carry one IR remote and one wired remote. My Nikon IR remote is this one. (Consider buying 2-3 of those as they tend to get lost and/or break easily.) For any Nikon camera below the D800 series, this remote with LCD screen is going to be a nice advanced option.
That’s the gear you need, and the rest of the tips that follow require use of those three items without exception. Once you have all three, and your fireworks spot staked out, compose your frame before the show starts (composition tips below), and turn on live view to focus on something in the distance foreground. Once you have that done, make sure to turn autofocus off so it doesn’t cause issues during the show. Now let’s dial in the rest of the camera settings…
Camera Mode

With most types of photography, there are multiple means to achieving the same general result, and which settings are a matter of personal preference. That’s true to a degree even in fireworks photography, but I believe there is one technique that is so far superior to the rest that it’s the only one we’re going to discuss.
That’s bulb mode, which (in Nikon DSLRs, at least), is what appears when you go beyond 30″ in manual mode. This is basically a “choose your own adventure” scenario, with the shutter speed entirely up to you based upon when you open and close the shutter via the remote. The reason this is the only option I recommend for your camera mode is because it’s the only mode that puts you in the driver’s seat.
This is also where knowledge of the fireworks shows you’re photographing comes into play. Definitely not something that’s possible with annual fireworks shows in random places that might change from year to year, but is with Disney’s lavish, choreographed shows.
Normally, I recommend people avoid spoilers by not watching YouTube videos of attractions. Not the case with photographers and the fireworks shows. You might only have one chance to shoot a given fireworks show on your Walt Disney World (or other Disney location) vacation, and you want to have the timing and intensity of the fireworks bursts down before you try photographing it. You should know when ‘scenes’ start and end, how brightness varies throughout the show, and when the grand finale occurs.
This may necessitate watching Wishes, for instance, 4-5 times on YouTube. If you’re really obsessive, you might even want to jot down notes on timing and use a stopwatch during the show to synchronize against those notes. (I don’t recommend that–too many balls to juggle.)
The goal here is being able to have the timing down so that you can open the shutter just before a scene starts and close it just after a scene ends.
Shutter Speed
Okay, but that still leaves the question of how long to leave the shutter open. The thing is, ultimately, that’s up to you, and the look you want to achieve. With bulb mode, you don’t need to choose a shutter speed longer than 30″. You could choose 5, 10, or even 17.8 seconds. Your shutter speed could be as low as a little over a second. (But not much faster than that, unless you have a really quick trigger finger!)
That’s very minimal guidance, and potentially intimidating if you’re just getting your feet wet with fireworks photography, so I’ll try to give you a little more to go on. (Additionally, all of the photos here are hosted on Flickr, so you can click them to view my EXIF data/camera settings.) I don’t think throwing you in the water and hoping you don’t drown is the best way to teach you to swim here…
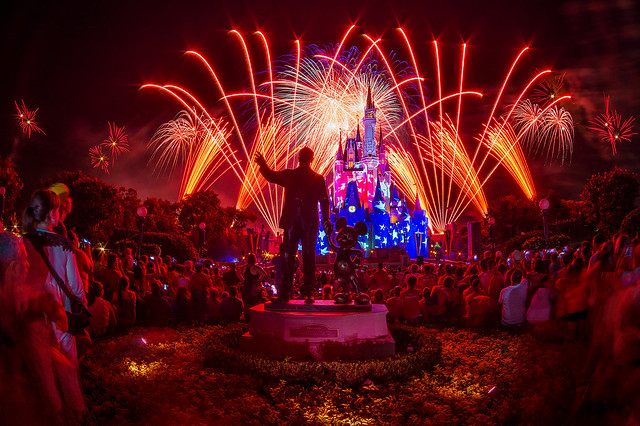
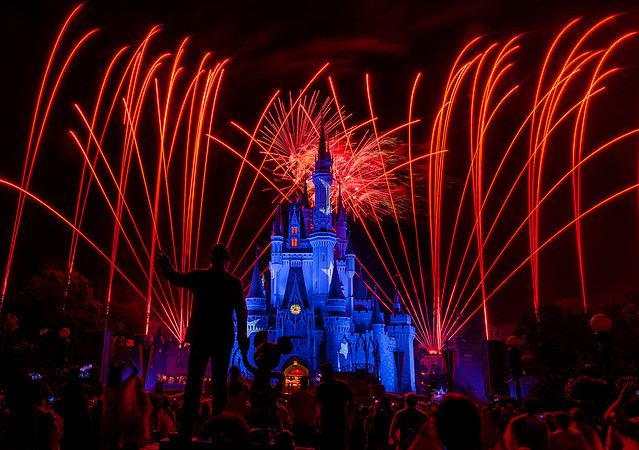
When I’m trying to capture a single ‘scene’ of fireworks bursts, my shutter speed tends to range from about 5 seconds to 15 seconds. The average is probably right in the middle, somewhere around 10 seconds. This is about how long it takes for a scene to play out, especially when there are symmetrical bursts on both sides of the castle, which tend to happen one after the other.
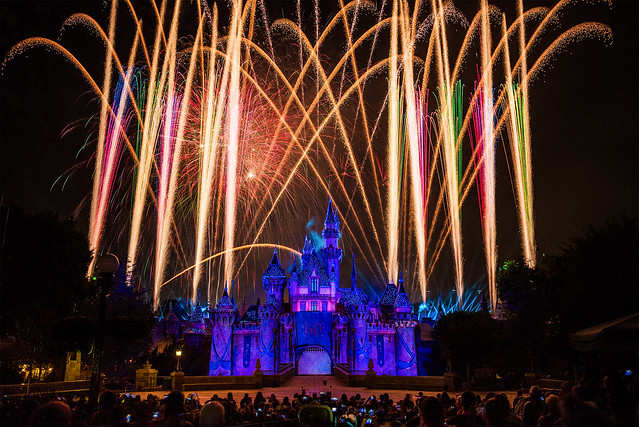
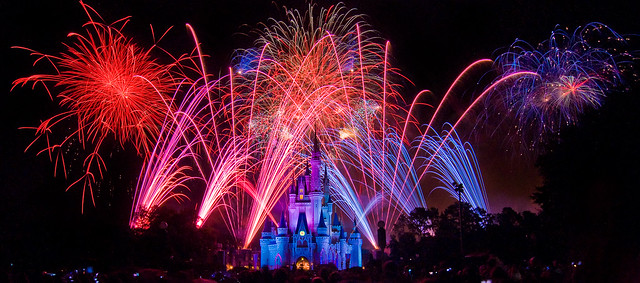
You can certainly go longer than 15 seconds, and sometimes pushing beyond 20 seconds is useful for capturing multiple scenes with bursts in different locations. One scene might have a lot of low-level stuff around the castle, while the next one is mostly high-level bursts above (and behind) the castle.
Once you start going longer than 15 seconds, you need to be mindful of successive bursts appearing in the same general location. Too many bursts in the same spot will, collectively, blow out the highlights in that spot on your photo.
That’s really it with shutter speed. Still pretty vague, but that comes with the territory…
Aperture
The intensity of the show coupled with how long you’d like your exposures to be dictates your aperture. As with shutter speed, there are no hard and fast rules. In terms of general guidance, I’d recommend using an aperture in the double digits–so f/10 to f/22.
Most of the time, my aperture is somewhere around f/14. I try to avoid going too much higher or lower than that. If you’re using a larger (smaller number) aperture, you run the risk of blown highlights. With the smaller (larger number) apertures, you’re going to have darker and potentially softer images (especially at f/22, where there’s a noticeable loss of image quality on most lenses).
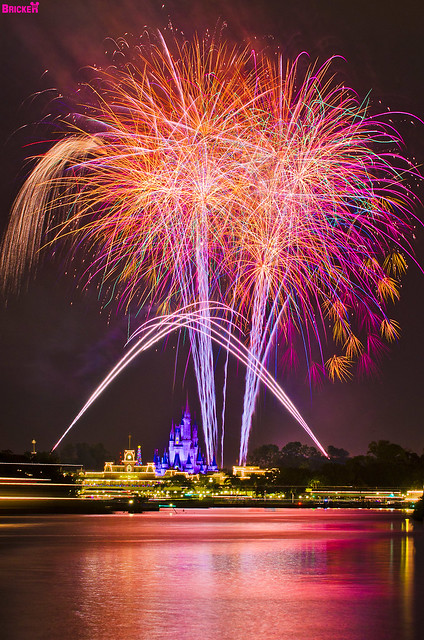
My one exception to this is grand finales and special tags, which feature more intense bursts. For ‘bombastic’ scenes like this that might make you think the aliens have finally declared war on Cinderella Castle, you might want to crank that aperture all the way up to f/22.
Even your smallest aperture is going to have some blown highlights. That’s just a fact of life, and totally okay. Those bursts are so intense that they appear blown even to the naked eye, so some blown highlights in that case will look natural.
ISO
ISO is the finally piece to the puzzle, and this is the easiest element, and one that tends not to vary so much. Aside from being part of the name of a critically-acclaimed ALF, dinosaur, and Mater-loving podcast, ISO is also the digital equivalent to film speed, for you old-timers out there.
If you’re shooting from a tripod, you’ll always want to use the lowest, native ISO (so don’t mess with the “expanded” ISO that can go lower–that’s just software-based, anyway. There are two reasons for this: first, it gives you the cleanest, most noise-free images. Second, it helps prevent you from blowing the highlights, and allows for a longer exposure or more reasonable aperture.
For most Nikon shooters, ISO 100 is the standard native base ISO. Some cameras, like the Nikon D810 (capable of ISO 64, which is why it’s my camera of choice for fireworks photography) can do better than that. Ditto that with Sony cameras. I’m not sure about Canon…I think they are still carving their sensors out of wood rather than using the advanced Sony sensors, so you’re on your own there.
As for other settings, there aren’t any. Oh, don’t use the flash. Unless your name is Elon Musk and you’ve just engineered some new prototype flash with crazy range, your flash is just going to illuminate the backs of the heads of people in front of you. Total n00b move.
Composition
Ah, we finally get to the most important aspect of all photography. Composition is something that is all too often overlooked in fireworks because…ahhhh, bright lights, loud noises, and pretty colors…what was I saying? Oh yeah, there is a propensity for ignoring composition in fireworks photography because the bursts themselves have such an allure.
We tend to focus on the bursts in the sky with our eyes as we watch the dynamic shows, but doing that with a static photo translates into something that’s really boring. Trust me on that. It’s like when people photograph the sunset with their iPhone, but literally the only thing in the scene is the colorful sky.
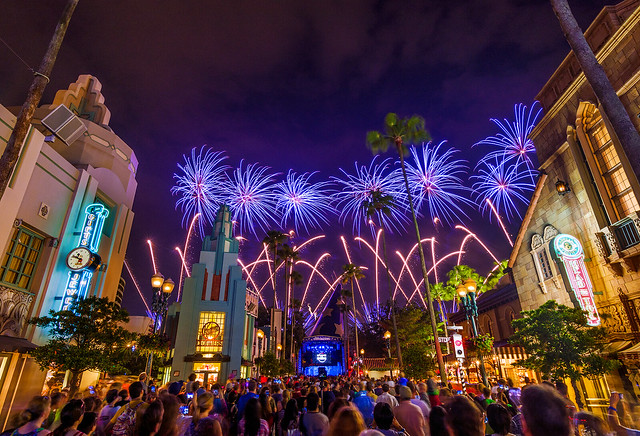
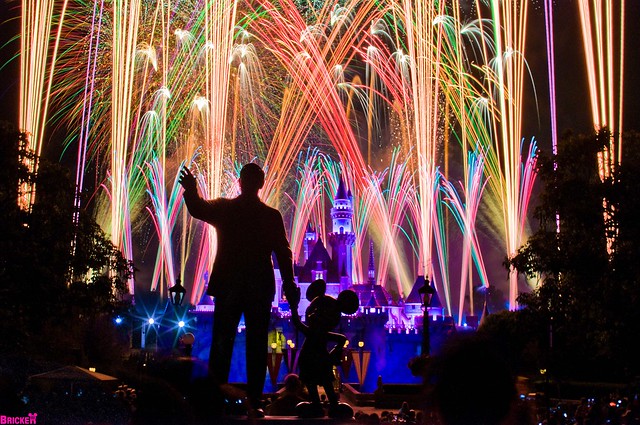
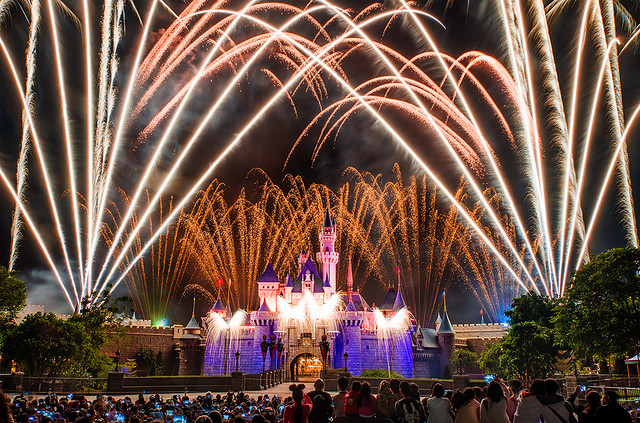
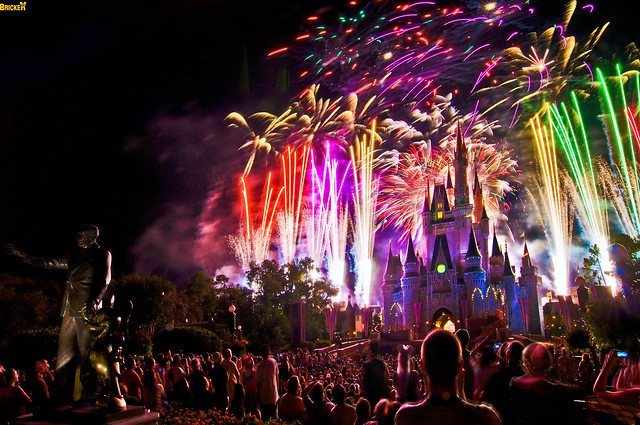
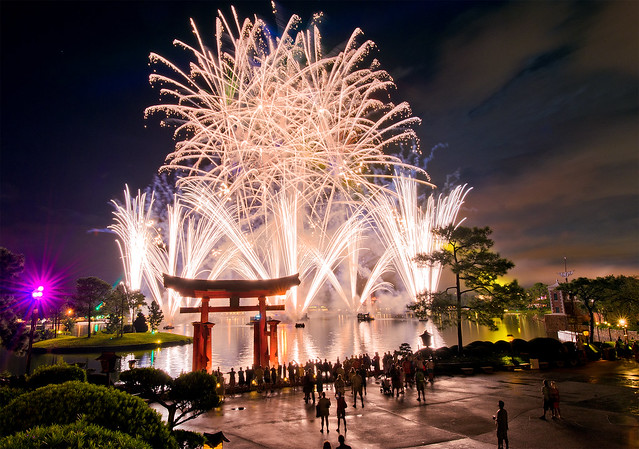
This is mostly a problem with non-Disney fireworks photography, since it’s hard not to frame the fireworks around the castle (or other object of visual interest) with Disney fireworks photography. If you’re shooting outside of the Disney parks, one of the best ways to make a fireworks shot interesting is to include a foreground or background object. Anchor the shot to the ground, and include something else in the scene for scale and context.
A good rule type thing to help you with this is that you should always be able to identify where the photo was taken by looking at the photo by itself. So, if you’re shooting over a harbor, include the water. This can even be done in some boring state fairground that might not offer much foreground of visual interest.
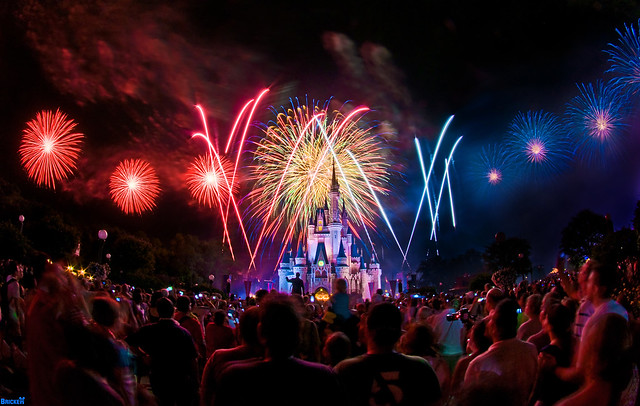
This is because there’s one foreground you’ll always have, and that’s the crowd. If there’s one fact of fireworks, it’s that they never play to empty houses. Failing all else, include the crowd for a human element. They will give the scene context, scale, and even a sense of awe. It’s really effective, and although there is often a temptation to eliminate people from landscape scenes, try to resist (at least sometimes) when it comes to fireworks photography.
One thing to note is that people, boats, and other stuff can tend to move during a long exposure. You might combat this by shortening your exposure a bit, but my advice would be to not worry about it or change your technique. Just let them be a little blurry (most people sit and stand surprisingly still during fireworks). Some motion blur there isn’t a big deal, at all.
Whatever foreground elements you use, it will likely enhance your photo and help tell the “story” of the fireworks show, providing greater context and visual interest to your viewer.
Advanced Level Stuff
This is all just a jumping off point. There are several more advanced techniques to throw into the mix once you learn the basics. One of my favorites is detailed in my Using Neutral Density Filters to Photograph Fireworks post. You can also apply other advanced techniques, such as the Country Shutter or merging multiple photos.
Speaking of post processing, that’s another big part of fireworks photography. However, I can’t say there’s anything unique to fireworks photography that calls for a lengthy discussion of post processing. Whatever you’d normally do in Adobe Camera Raw, Photoshop, Lightroom, or whatever editing software you use applies pretty much equally here.
There is one thing I will mention because it’s a common pitfall that I think should be avoided, and that’s highlight recovery. In this era of high dynamic range, there’s the temptation to avoid blown highlights at all costs. This makes sense in many situations, and that can extend to fireworks–but not always. Instead, tailor your fireworks photo editing towards how you remember the bursts appearing in real life, with your eyes. A grand finale looks blown with the naked eye, and trying to recover all highlight detail there is not only a fool’s errand, but it will result in a finished photo that looks totally phony.
Okay, I think that covers it in terms of fireworks photography 101! Hopefully you’re able to brave the July 4th crowds at Walt Disney World and put these tips to good use. Or, if you’ll be spending the holiday at home, make use of the concepts here to hone your skills.
This still might be intimidating, but don’t let it be. The thing about fireworks photography–all photography, really–is that there’s really only so much you can learn by reading. The act of doing, and learning via trial and error is essential. You’re going to make a lot of mistakes your first go-round. That’s normal and to be expected. If you were some sort of fireworks savant your very first time, what would be the fun in that. Photography is fun because it’s a process of learning, improving, and constantly chasing something better.
Want to learn more about photography to take great photos in the Disney theme parks and beyond? The best place to start is Tom’s Ultimate Disney Parks Photography Guide, which covers a variety of topics from links to tutorials, tips, and tricks to recommendations for point & shoots, DSLRs, lenses, and more!
If you do want to purchase new photography equipment, we recommend the following trusted & authorized retailers. Buying from these retailers helps support this blog, and doesn’t cost you a thing:
Amazon
B&H Photo
Adorama
For other photography equipment recommendations or photography tips in general check out a few of my top photography blog posts:
Best Books for Improving Your Photography
5 Indispensable Tips for Better Vacation Photos
Choosing the Best Travel Tripod
Choosing the Best Camera Bag for Travel
If you enjoyed this post or found it helpful, we’d really appreciate it if you’d share it via social media. We put a lot of work into making this site a helpful planning resource, and hope it’s useful to you! 🙂
Your Thoughts
Okay, that was a lot to digest…any questions? If you’re an experienced fireworks photographer, do you agree or disagree with my tips? Any of your own to add? Share your thoughts or questions in the comments!
Hey Tom, looks like your link for How to Photograph Fireworks website is to a website that got snatched up and shadily 301’d by some randos. Just letting you know that you’re linking to these people through this page.
Thanks for your tips. This is a great read. I’d love to know how you handle long exposures and bulb mode with the changing projections on the Disney castles. Do you have any tips on how you manage When your exposures are a minute or more?
Thanks for the tips Tom! I used them last week and got some decent photos from the plaza dessert party viewing spot (which made up for my kid sleeping through the whole show…so much for a sugar rush). I know you’ve said your photography posts aren’t that popular, but I always enjoy them, and they’ve helped me immensely with my photography!
How do you avoid trails from horizontal movement of the fireworks? It seems over the course of a 10 second exposure (or longer with a ND filter, the wind will inevitably cause some blurring)
Your guide is awesome! But what should I do if I made a photo with poor sharpness?
I used plugins for mac such as https://macphun.com/blog/professional-photoshop-plugins. But with your advice I don’t need it anymore! 😉
I’m wondering how you juggle all your equipment & keep it from getting wet & ride on the rides, etc…..
Have you ever tried to take fireworks photos from the Tomorrowland Terrace during the Wishes Fireworks Dessert Party? We were one of the first people to sign up for the desert party for December 2016.
Ages ago, before that area was reserved for a dessert party. It’s an okay view, but you’re off-center.
Please include the EXIF data on your images. That would take a lot of the guesswork out of WDW photography.
Thanks
What camera did you use for the sample shots?
Based on other recommendations from your blog, I am considering purchasing the RX100 IV for my trip in September. Will that camera be able to produce results anywhere near these sample pictures? Or is that pushing it.
very helpful! Thanks!
Well done, Tom. You have covered all the bases. There is much more, though, like the word “LUCK”. Yes, “luck” plays a role in what a photographer will get when shooting fireworks at Disney or anywhere else. However, CAREFUL PREPARATION is important. The more prepared a photographer is when shooting a fireworks show, the better his or her results will be. One more thing…We learn shooting a show by our failures. Don’t be afraid to fail a little bit, because in failure, we are learning what to do the next time. I could comment about some of the techniques, beginner and advanced, mentioned here in your post. However, the only thing I would like to say is watch the videos on Youtube of the show you are going to shoot and familiarize yourself with the queues. Base your exposure time on WHAT YOU ARE SEEING, rather than a certain length of time. That said, know what your basic exposure is so that you don’t go to long or too short. I personally like to use .9 ND filters. But that does not mean that I shoot 80 second exposures at f22. Don’t forget, you can open up the lens and still have long exposures with multiple bursts. The longer your exposures, the fewer frames you will get during a 13 minute show!!! I like to shoot around f13, 20 seconds, .9ND filter, ISO 100, for instance. That way I get a nice build up of bursts, but I also get many frames per show. The .9ND filter helps to control blowing out the highlights as well. For the finale of the show, I quickly spin the aperature dial to f22 or smaller and I feel out the time. Sometimes I get lucky doing this. Tom, you did a great job with your thoughts on how to shoot fireworks. Very helpful for any photographer! Happy fireworks shooting!
this is awesome thank you so much! i see so many amazing firework photos and mine are just sad. definitely going to practice on the next disney trip!
Your guides are the best. I always take with me the settings for fireworks, parade, and dark rides on a cheat sheet. Great little thing to have incase I need to double check settings.
I was wondering did the rules for autofocus change with fireworks? I thought it should be turned off and set to infinity.
I can’t believe I overlooked something so important. Going back to add that now. Thanks for the heads up!
No thank you for all your help. I learned a lot from your blog and appreciate all of your tips.
Just wondering with the picture taken at the TTC. Did you use a filter.