
5 Indispensable Tips for Great Vacation Photos

3. Establish the Scene
If you’re photography-minded like I am, this may seem like pointing out the obvious. A lot of us naturally gravitate towards the beautiful sunset photos of beautiful landscapes. For those of us who don’t do this, though, (some people instead might focus on the details too much) it’s important to remember to stop and take some “big picture” shots.
In film, these shots are referred to as “establishing shots.” Before a lot of scenes, there is a quick view of the location of the scene to give the viewer a frame of reference. Likewise, in photo-sharing, it’s good to establish the scene before you start focusing on the details.
Your Facebook friends/subscribers may love seeing those 34 Mickey waffle photos you took at the Crystal Palace, but they may also wonder where the heck you ate so many Mickey Mouse waffles! Let them know by starting out with a nice shot of the gorgeous exterior of the Crystal Palace.
It’s important to remember to capture establishing shots of a variety of scenes, not just those breathtaking landscapes. This was a hard one for me to learn, but I’ve made an effort to focus on the less-obvious landscape shots and photographing the “unspectacular” in unique ways to make the photos (sort of) interesting.
Instead of just beautiful shots of the Castle and other icons, I have started taking landscape photos of ice cream stands and other places we visit throughout the day. I’ve found that, in retrospect, these shots are the ones that instantly transport me back to that moment in time from our vacation more than any other landscape photos.
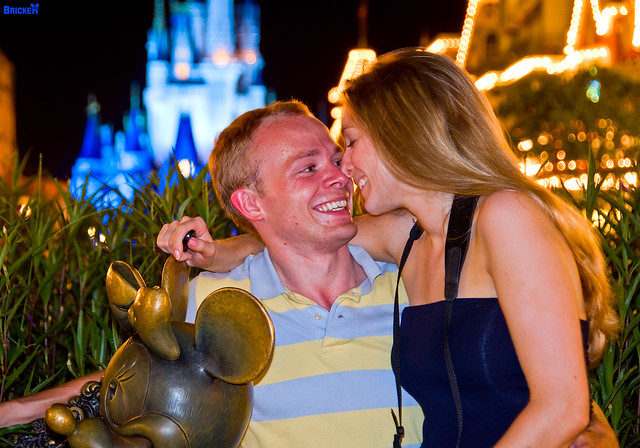
2. Get in the Shot!

This is a really tough one for a lot of photographers. In fact, I think a lot of people become the designated vacation photographer specifically so they won’t have to be in the photos. No matter how shy, self-conscious, etc., you are, GET IN THE PHOTOS! Seriously. It may not interest you, or you may not want photos of yourself right now, but what about in 2, 5, or 10 years?
This is especially true for parents vacationing with small children. Mom or dad may choose to be the designated photographer and not care that they’re in the photos, but what happens once your kids are older, and want to look through those old family albums? “Why did only mom/dad come on this vacation with us? WHERE’S OUR OTHER PARENT?!!?” Rather than induce hysteria into your children in the future because they think you didn’t love them enough to come on the vacation with them, “prove” you were there by getting in at least a few photos.
If you’re worried about handing your expensive camera off to a stranger (don’t be–people are mostly good!), carry an inexpensive point and shoot that you don’t mind handing off, or carry a GorillaPod that you can set up with the self timer. Or, just turn the camera on yourself with an outstretched arm! Trust me, your family will appreciate you being in the shots.
1. Focus on the Moments.
It’s good to have a few posed photos (I know we take more than that each trip!), but it’s also really important to capture photos during those candid special moments when people least expect it. I’m not suggesting that you surprise photo bomb old Uncle Orville while he’s picking his nose. Rather, I’m saying that candid photos and photos without everyone properly posed and smiling ear-to-ear are often some of the best shots.
For me, Sarah makes this easy when we’re at Disney because she stares longingly into space and daydreams about being a Disney princess at various times during the day. She gets a lot of shots of me this way, too. Well, except I’m dreaming about being Figment rather than being a princess.
If the people in your party are human beings, it should be fairly easy to capture their emotions at various times on your trips. If you’re having trouble finding the right moments to capture this type of shot, there are things you can do to distract your family from looking at the camera.
These are the shots you’ll cherish for years, more-so than any “say cheese” posed shot.
One thing that will help you better achieve all of these goals is to do a little advance planning. I’m not suggesting you plan your trip down to every step you’ll take while in the parks, but if you have a general idea of what you’re doing, where you’re dining, etc., you can then do some advance research for photography. Go on Flickr or Google Image Search and see what others have captured in the restaurants, attractions, etc., that you’ll be experiencing.

Hopefully these tips will help you take better vacation photos–let us know if you have any other tips in the comments! I look forward to seeing your best vacation shots on the various social media websites!
Want to learn more about photography to take great photos in the Disney theme parks and beyond? The best place to start is Tom’s Ultimate Disney Parks Photography Guide, which covers a variety of topics from links to tutorials, tips, and tricks to recommendations for point & shoots, DSLRs, lenses, and more!
If you do want to purchase new photography equipment, we recommend the following trusted & authorized retailers. Buying from these retailers helps support this blog, and doesn’t cost you a thing:
Amazon
B&H Photo
Adorama
If you enjoyed this post or found it helpful, we’d really appreciate it if you’d share it via social media. We put a lot of work into making this site a helpful planning resource, and hope it’s useful to you! 🙂
Your Thoughts…
What are your tips for better photos at Disney? Any recommendations or ideas of your own that you’d like to share? We love hearing from readers, so if you have any other comments or questions, please feel free to post those, too.


Hello – Appreciate your tips and have put them to good use. Thanks! One question: Can you tell me where that statue of a smiling Pluto is located? Thanks!
I believe there are eight “bronze” statues of various Disney characters located by the two fountains near the Partners statue. As you walk down main street towards the hub, the fountains are on either side of the street, just before Walt and Mickey. If you check out the area on Google Maps, you can actually see the pedestals the statues stand on.
Just returned from WDW. I’m so glad I read your blog before we went, I appreciated so many of your suggestions! Thank you!
For candid shots, I’ve personally found this to be the place my cell phone camera comes in very handy. It’s easy to point it in someone’s direction, but move your fingers in ways that make them not realize you’re taking a picture.
Awesome article thank you!! I’ve recently discovered this blog and am now addicted. I go to Disneyland all the time, and am planning for my second Walt Disney World trip in June.
It also helps to be ridiculously photogenic such as yourselves 😉
Tom, I’ve admired your photos for years. I particularly like your comments on “Get in the Shot”. As I’ve gone back and looked at our old photos – and especially the old Kodachrome slides that my dad took at Disneyland – the ones that are the most meaningful are the ones that show our family in the photos. Yes, they were usually posed, but still, to see us as we were then is memorable and lots of fun.
By the way, that photo of Sarah looking back on the Silly Symphony Swings is one of my favorites. A wonderful shot of a lovely lady!
Wonder how you managed to get soo many shots with no person in frame …i mean empty streets 🙂 . when does this happen in disney. i also have a plan in july 2015 when is it possible to get such shots, i tried to find one person but cant find anyone. is it photoshop?
Super inspired with your photography.
i have Sony Rx100 and also Canon 6D with 24-300mm F3.5-6.0 lens / 24-105mm / 50mm F1.8 / 100mm F2.0 / External Youngnou Flash & tripod.
What should i carry on PARK? as whole kit is quite heavy with 2 kids to manage and orover how i can manage my KIT BAG during RIDES?
Hi gain,
Hi again,
Silly me — I just found your excellent entry about the photopass option:
https://www.disneytouristblog.com/photopass-plus-review/
Bad fan, no Mickey beignets for me 🙂
Still love the photo tips. Many thanks!
Heather:D
Hi Tom,
I appreciate the tips. Most esp about including yourself in the photos. I have a tendency to hide behind the camera myself. Just a few thoughts:
Framing – Someone once suggested to me to mentally draw a grid across your image with two lines by two lines. See that intersection in the top left or right on portrait? That’s a good spot to focus your shot. Not all the way to the edge, just where the two lines meet. Folks look better somewhat off center. Also works for landscape by placing your horizon in the middle third instead of bang in center. For example: top 3rd sky, middle 3rd Tom Sawyer Island, bottom 3rd rivers of America. Even better – mix things up with landscape & portrait.
Placement of photographer – I noticed you already do this. However, it’s worth noting that asking folks to take a picture of your “Faces not Feet” helps. I usually frame my shot with my sweetie pretty close in & then hand off the camera to the unsuspecting assistant passing by. You can really tell the difference in our photos. Early days; tiny little person with indistinguishable features surrounded by sidewalk & crowds. Now; good clear closeups with a pretty, crowd free backdrop. Also, get down low for small chldren or try standing on something to elevate your perspective for big shots like parades etc.
Last bit o advice – take a chance with Disney photopass. Last time we went we stopped for Disney photographers a lot. Got some amazing pictures. The best part was just buying a cd of the whole trip & cropping / editing at home. We have a pretty unbelievable shot of me dressed as a fairy kissing a bemused hubby with “mouse ears” from the Paradise Pier roller coaster at night. Back when DCA hosted the Halloween Haunt – they had photographers scattered around with tripods & long exposure timers to take the shot. Amazing!
Hope that helps.
Heather
PS love the shot of your lady love on the swings. Very ethereal
I’m headed to Disney for several days. Trying to pack/carry light, since I’ll also be carrying around family supplies for two young kids. I am shooting with a Canon EOS Rebel t5i. Haven’t decided if I’m taking the speedlite but probably taking off the extended battery grip for reduced size/weight. I have a Canon 50 mm f/1.8, a Tamron 28-75 mm f/2.8, and a Tamron 18-270 mm f/3.5-6.3. Two questions.
1 – Should I take both the 28-75 mm f/2.8 and the 18-270 mm f/3.5-6.3? (I’m taking the 50mm for dark rides.) If not, which should I take?
2 — Since I need a multitasking bag, I’m leaving the camera bag and taking a more traditional backpack. Any suggestions for lens protection (and camera protection) inside a traditional (non-camera) backpack?
Speaking of the Sword in the Stone pictures in the back of the castle pictures: I have always taken pictures of this straight on with the carousel in the back. But on our last trip I got a better idea for that photo. While my wife was shopping under the careful eye of the Giant; I snapped a few pictures of the S IN THE S while down on one knee and shooting up at the back of the castle. It makes a great shot. When my wife came out, I took one of her that way too. While she was shopping I took several pictures for families with their phones and cameras in the same way by kneeling down on one knee. When I was taking their picture, nobody could understand why I was kneeling. When they saw the results, they all turned aroundand looked up to see the back of the castle. Once they saw the photos they thanked me many times over.
I have to admit, I selfishly enjoyed the thankful praise. Tom I’ll bet you already took this one with sara holding the sword. And if not, what are you waiting for. I Hope this gives people an good photo idea
Great tip–I know exactly the perspective to which you’re referring, and yes, I’ve shot it a time or two!
In this post, you recommend: “Right now, I think the creme de la creme is the Canon PowerShot S95.”
Now that some time has passed, what do you think you would recommend now?
Hello,
I love your photos! I was wondering, what type of lens did you use for many of the shots in number 2. And were you using a full frame camera or cropped?
– Crystal
Tom – We are going to Disney World for the first time this fall. I use a sling bag for my Canon DSLR. What do you do with your camera bag while you are on rides. Is it always possible to carry backpacks, camera bags, etc. onto rides? Thanks!
Great tips! Can’t wait to try them out when we go back to Disney next year.
I love your advice on here, I’ve just stumbled across it in the process of figuring out my own Disneymoon in 2016. My fiancé is the photographer in our little family-to-be, what would you suggest now for a amateur who wants to take pictures as well?
Also, off-topic but how best would you suggest couples from Australia organising their Disnyemoon?
Cheers Sim
I just have to say that you and Sarah make the most lovely couple 🙂
Great tips, I love your shots! I’m so bad about being in pictures, because my husband is really terrible at taking them. I feel like every photo he takes of me is somewhat less than flattering! LOL! I might have to pack a little tripod for our trip this time, and take them with the timer…
Also, I wanted to echo, for the love of all that is good, BACK UP YOUR PHOTOS! My husband and I went to Germany for six weeks shortly before Christmas a few years ago. It was our first time in Germany, and Hubby’s first time overseas. Everything was gorgeous, and I took approximately 2.7 million photos (felt like it, at least, I had a great time taking photos). When we came home, we discovered that our backup system had been overwriting our photos on the hard drive every single time we pulled them off the SD card. We only had the last week or so and a few scattered here and there that I’d managed to upload to Dropbox on the rare nights of decent internet. It was heartbreaking!
That is just heartbreaking. So sorry to hear that it happened. 🙁 Definitely a great tip, though.
You comment on people who may be afraid to hand their camera over to a stranger. Don’t forget, in Disney parks, cast members are always willing to help take a photo (if they aren’t busy). Even the professional Disney photo pass photographers will take a photo with your camera as well. Somebody my favourite photos are those, because those guys are great with photo composition and posing.
Just something for guests to keep in mind.
Great tips! As a pro photographer, it is easy to never hand over the camera and be IN some of the pictures. I have to make a diligent effort to be a part of the photos and not hide behind the camera. I am bringing my SLR essentials and a my waterproof point and shoot, this way my husband can take pics too, without being intimidated by the big kahuna, as we affectionately call my Canon 7D when it’s all tricked out with grip, flash, bigger lens… It can be overwhelming to anyone who doesn’t know their way around the equipment.
Tom, have you ever considered a monopod? It helps a lot for you to “get in the shot!
I love the tip about getting in the shots. I often come home from a trip and think “why wasn’t I in more pictures?” Perhaps less so at Disney though, because there’s always a PhotoPass photographer on hand to take a pic with your camera.