
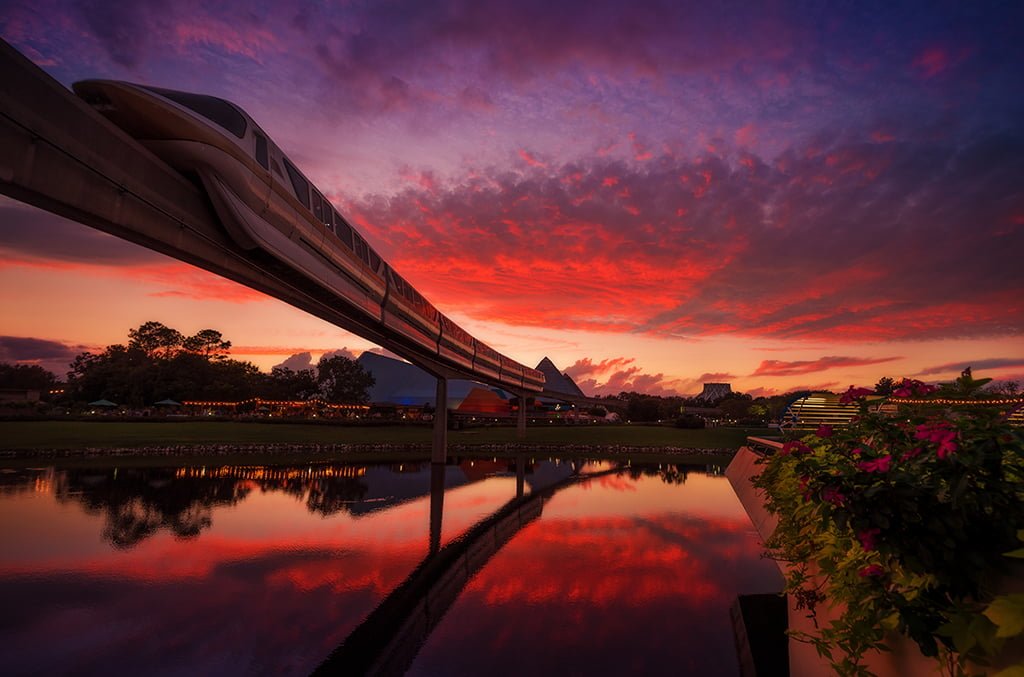
Ultimate Disney Parks Photography Guide

Looking for the best camera or lenses, tips for taking great photos or to improve your photography? This guide offers tutorials to take better photos in a variety of scenes at Walt Disney World, Disneyland, and beyond! (Updated July 17, 2024.)
These tips will help you take better photos of Disney fireworks, dark rides, Cinderella Castle, and much more that’s specific to the parks. However, the first thing you should do is learn the basics of photography. For this, I highly recommend a copy of UnderstandingExposure, which covers the technical side of photography. For understanding what makes for an aesthetically pleasing photo, read The Photographer’s Eye, which covers composition.
All of the expensive equipment in the world won’t help you if you haven’t learned the basics, and those two books are the best way to learn the basics and how to take photos that aren’t just snapshots. Books are how I taught myself photography and many others have done the same. Books are a lot cheaper than a new lens, and if you’re a beginner, those will improve your photography more than a new gear. You are better off with an iPhone plus skill and knowledge than a $10,000 camera and cluelessness.
Along those lines, realize that no camera “takes good pictures.” Some cameras can help an adept photographer more than others, but if the person taking the photos doesn’t do things right, photos taken with a fancy camera can look worse than photos taken with an iPhone. Likewise, many experienced photographers can take better photos with an iPhone than inexperienced photographers can with expensive DSLRs on Auto Mode.
This guide will primarily focus on providing you with resources for learning more about photography, so you can really take your photos to the next level. If you’re sitting around at home practicing social distancing or self-quarantining, the good news is that this is the perfect time to learn photography!
It’s surprisingly easy to improve your photography at home, alternating between reading books and practicing with subjects around your house or in your backyard (my #1 subject for testing out new photography techniques is our cat!). Knowledge is so much more important than equipment, and once you learn more about photography, you realize you don’t need to waste additional money on more equipment!
With that update out of the way, let’s continue with a few of my favorite photography books…
Disney Photography Tips

We’ve done a number of blog posts providing tips for improving your photography at Disney. I can’t stress enough that knowledge is the biggest component of taking good photos at Walt Disney World (and beyond!) so you should really read some of the tutorials I’ve written. They have helped a lot of people.
You should read these after you read Understanding Exposure. These guides all assume you have a decent foundation to understand the basics of photography, and you might be confused by these if you don’t know the basics:
- Disney Dark Ride Photography Guide
- How to Photograph Fireworks
- How to Take Great Photos with Your Point & Shoot Camera
- Top 10 Lenses for Disney Parks Photography
- 5 Indispensable Tips for Disney Photography
- Unique Family Photo Ideas at Disney
- Top 10 Tips for Night Photography at Disney
- Tips for Improving Your Photo Composition at Disney
- Tips for HDR Disney Photography
- Best Magic Kingdom Fireworks Spots
- Best Disneyland Fireworks Spots
- Tips for Using Prime Lenses at Disney
- Tips for Using Telephoto Lenses at Disney
- Main Street Electrical Parade Photography Tips
- World of Color Photography Tips
- Fantasmic Photography Tips
- Christmas Photography Tips
- Top 10 Cinderella Castle Photo Spots
- Top 10 Sleeping Beauty Castle Photo Spots
- Neutral Density Filters for Fireworks Photography
This just scratches the surface on the photography guides we’ve written. To read and learn more, browse the photography category of posts on the blog. Once you’ve learned a bit, it might be time to buy some new equipment to help you take better photos. Read on for our buying suggestions…
Cameras

The first thing you need to do is determine which type of camera is right for you. Over the past decade, I’ve tested 20+ cameras and talked with hundreds of beginners who wondered which camera to buy. From that, I’ve learned that the “right” camera for a beginner is almost entirely a matter of personal preference and goals.
For the vast majority of people, modern camera phones are more than capable. Newer models of the iPhone, Samsung Galaxy, Google Pixel–and probably other phones with which I’m unfamiliar–are all fantastic. If you’re simply sharing on social media and don’t have demanding conditions, specific use cases, or need the highest quality, camera phones are probably good enough. They are the right answer for 90% of people, which is a big reason why the camera market is shrinking. I even regularly forgo taking my big camera bag and just use my phone!
Let’s assume that, for whatever reason, you want a dedicated camera. When thinking about which type to buy, you have to think about your intent. Are you primarily interested in capturing quality photos of your family’s memorable moments on vacation? Consider a nice point & shoot. Concerned about camera size and weight? Go point & shoot. Want an starter camera that will make learning easier? Again, think point & shoot.
We think the Sony RX100 is the best point & shoot camera line on the market. I’ve used multiple different versions of this camera since it launched over a decade ago, and have been wowed by all of them. Unfortunately, Sony hasn’t updated this line in a few years and the RX100 VII is still really expensive despite that. You might be able to pick up a used or older model cheaper–and I’d recommend considering that. Mine is still going strong 5 years later.
Another alternative would be opting for the Sony ZV-1, which is a newer camera that costs less than half the price of the Rx100 VII. It’s marketed at vloggers, meaning that it’s also very capable of video. As someone who exclusively does photography, this isn’t a selling point for me. But it’s fairly undeniable that the Sony ZV-1 offers better bang for buck, and is a nice upgrade from iPhone quality photos and videos.
Everything above that is either going to be a DSLR (if you’re old school) or a mirrorless camera. My two main cameras now are the Nikon Z7 II full frame mirrorless camera and Nikon D850 DSLR. Both of these are pro grade cameras that offer unparalleled performance. They’re not cheap, and are only recommended for those who are truly serious about photography and have unmet needs by lower-tier cameras. I would not recommend anyone learning photography purchase either of these.
Honestly, I’m not sure which entry-level “big” cameras I would recommend at this point. My camera testing and reviewing days are behind me, and I’ve been so satisfied with the Nikon D850 and then the Nikon Z7 II that I haven’t bounced around trying other cameras in the last ~5 years. Consequently, I’ve become a bit out of touch with entry level models and what Canon, Nikon, Sony, and other brands are doing to innovate.
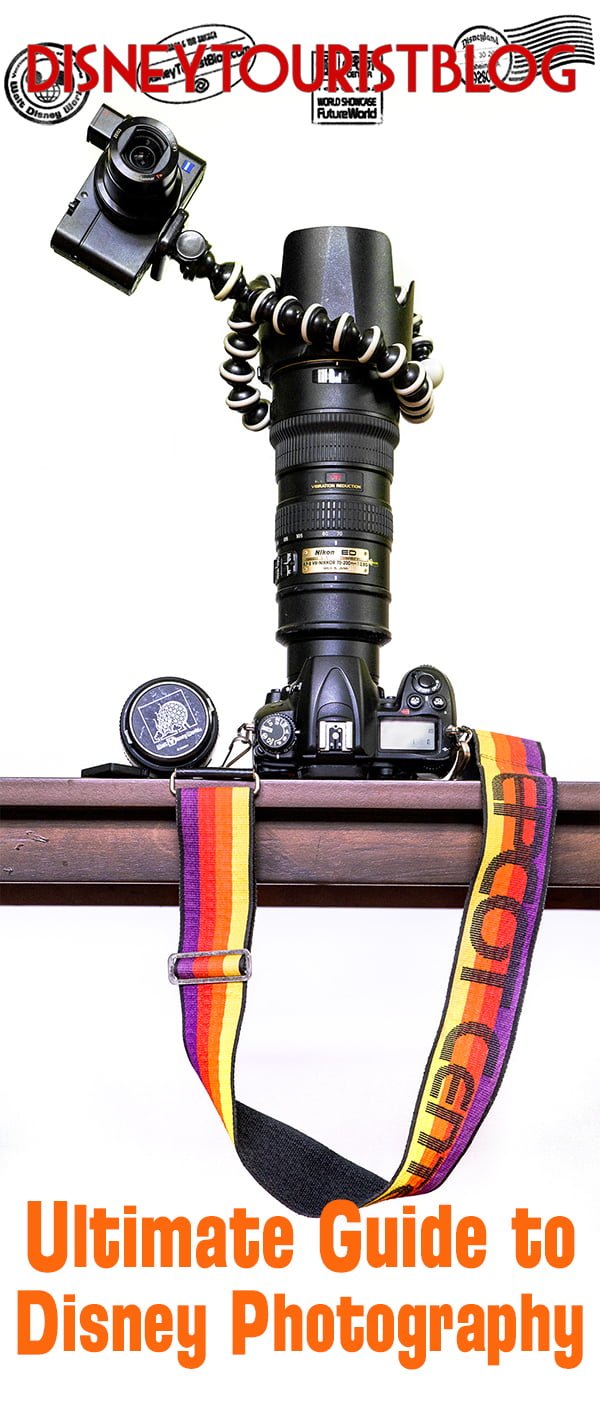
If you want look at the equipment I currently carry, check out What’s In My Camera Bag for 2024. That’s going to be the best resource if you’re interested in going with a full frame Nikon mirrorless camera and are wondering which lenses to purchase.
Ultimately, which of these cameras you buy depends upon how serious you are about photography. If you’re just getting started, no matter how excited you are about photography, it’s probably smart to not buy anything above an entry level model, no matter how large your budget.
Guide Conclusion
As mentioned above, the vast majority of people just getting started in photography are probably best suited by a high-end point and shoot camera, with my absolute top pick being the Sony RX100. This is a great way to get a taste of serious photography with customizable settings and excellent image quality, but in a compact package. Most people won’t outgrow that camera, but if you do, then look at DSLRs or mirrorless cameras.
If you’ve already decided that a DSLR camera is your best option, you’ll want to think about everything you need to go along with it to really take your photography to the next level. If you’re on a limited budget, start out by making 3 upgrades: 1) tripod, 2) wide angle lens, 3) prime portrait lens or mid-range zoom lens. I’d say these are the 3 best purchases a new photographer of the Disney Parks can make to improve their game.
However, if you really want to take your photography to the next level, gear is not what you need–at least not exclusively. What you need is knowledge. You will never take amazing photos in auto mode. You need to start by getting a copy of Understanding Exposure to learn the fundamentals, and then read more advance books, tutorials, and practice like crazy. Anyone can become great at photography, but you can’t get there just by purchasing fancy toys. 🙂
Finally, a word of warning. Don’t take shortcuts when buying photography equipment. Yes, it’s expensive, but I’ve discovered first-hand that buying photo gear on eBay or Craigslist is a huge risk. You don’t know how the seller took care of their gear, if it’s grey market (meaning US manufacturers won’t service it if there’s a problem), or what problems may come up down the road. You also don’t save that much over buying new. Finally, you don’t get a warranty. Things do go wrong with cameras, seemingly inexplicably, and it would really stink for that $1,000 investment to break with no recourse for you.
We’re Amazon Prime members, so we almost always order from Amazon.com. I also recommend Adorama.com
, B&H Photo, or Abes of Maine, but I generally avoid all other online photo retailers (I STRONGLY recommend avoiding J&R Cameras due to two negative experiences I’ve had with them). By the way, if you are considering a purchase of any photography equipment, lenses, or anything else for that matter we would greatly appreciate it if you use the links in this post to make your purchase. It benefits the site, doesn’t cost you a dime, and helps us to keep providing you with useful(?) content!
Your Thoughts
What have you found helped improve your photography? Have other photography tips of your own to add? Other gear recommendations? If you have questions, please leave them in the comments below and I’ll try my best to help!


How many photos that are shared on this blog are taken with the Nikon D3100? I am just starting to get into the manual mode and would love to see more photos of what my camera can do in the Disney parks. Thanks for the insight in this post!
Tom, the link for the Velbon Luxi-L tripod above stopped working. But the B and H Photo and video site has one. http://www.bhphotovideo.com/c/product/589888-REG/Velbon_ULTRA_LUXI_L_Ultra_LUXi_L_Tripod_with.html
Hi Tom,
What is your method for uploading photos (direct from camera, integrated reader, USB reader, etc…)? The reason I ask: I recently upgraded to a dedicated USB 3.0 reader and realized it was a significant time savings (every little bit helps!). Thanks!
-Adam
Hello,
Love this blog, thank you for the resources…
I was wondering at what time do you normally shoot? There are no people in your shots? Do you have a special pass?
Thank you,
Maria
If you wait until late at night (especially when the park is open really late) you’ll find that you can capture plenty of photos without people in them. Best of luck!
Thanks Tom!!!
Hey Tom
Your Link for the Luxi Tripod is broken.
Just wanted to let you know
Mary
Do you have any suggestions for use of a point and shoot at the Christmas Party? I’m going in a few weeks and recently got a new Nikon L820. I’ve been trying to use it as much as possible so that I can feel more comfortable. It’s great (and marketed as such) at lower light photography so I’m fairly confident I can take some decent pictures of the parades, maybe some rides (big maybe there) and hopefully the fireworks. I’d love any tips you might have specifically for a point and shoot though.
Any reviews or recommendations for photo printing or photo book sites? I typically use snapfish but haven’t wen too impressed with the quality
I don’t know if Tom would agree, but for higher quality prints I always use mpix. A lot of my professional photographer friends agree that it is the only site to use.
I’ve never used Mpix myself, but I’ve heard great things. Very popular with pros.
I use BayPhoto: https://www.disneytouristblog.com/purchase-disney-photo-prints/
Hi there,
I will be Honeymooning at Disney this coming May and my fiance and I would like to buy a new point and shoot camera for our trip. I’d like to stay below $300 price point but get the best camera for my buck. I’ve been looking at the Canon PowerShot SX280 HS. What are your thoughts about this point and shoot camera? I’d really like to get some half decent shots of the fireworks, but mainly a nice camera to bring with us to capture this special time! Any input would be greatly appreciated!
Thanks!
Is there a specific reason you suggest the Fotodiox remote instead of the Nikon brand remote? This is the next accessory I plan on picking up & your feedback is most appreciated! Thanks! BTW, I love your site and follow you on Pinterest & Facebook…Your tips & reviews are very helpful and much appreciated!
Price. That’s it.
Do you have any suggestions for graduated neutral density filters? Do the filter holders fit multiple lenses or do you have to buy a holder for each lens?
Sorry meant to add a new comment to reply to someone else.
I don’t use graduated ND filters. Not a fan of them.
Think of buying Sigma 8-16mm f/4.5-5.6 DC HSM, any other lenses will you suggest to consider before taking a call.
Tokina 11-16mm f/2.8 would be the other lens I’d consider. Both have strengths and weaknesses.
Bought the MeFoto Road Trip for Photo Magic. I’ll let you know how I like it. I am going to try out the ball head that came with it and see how I like that one. I have just had cheap tripods in the past, so anything will be an improvement!
Love your reviews. Got a lot of gear for the trip. Here is hoping I can drastically improve my pictures with some help! 🙂
Best of luck with it–hope you have fun at PhotoMagic!
what do you do with all your equipment on water rides!?
Rides like Splash Mountain aren’t an issue. When I do Grizzly River Run, I get a (free) locker for my gear.
The pictures on this website are amazing!! I wish you’d include more of the technical info other than just the lens used i.e. shutter speed, f-stop, ios etc. Especially in the photography section of the blog
Hi Tom newbie here. I have a D3200 any suggestion on which lens I can use for this type of camera? I love all your Disney night shots and fireworks. You think I can take photos similar to yours with D3200? Any help and suggestion will be greatly appreciated. Thanks.
Thanks for all that information. Most of it went totally over my head, Im a point & click kind of guy, with a basic digital camra. The main thing I got from this though was you don’t nesaserally need the best most flashy camra to great phtos. Somthing that will come in handy not only on my next trip to DW, but also in other situations when photos need taking.
Yep, that’s a great take-away! Knowledge of photography principles applies across the board, not just with DSLRs.
Oh my, this is so overwhelming. I just upgraded my point and shoot yesterday and bought a D3200 for our first trip to WDW Jan 2014. I think I have to learn a whole new language to be able to learn to use it as I only understood about 1/2 of this post! Good thing I have a long time to learn before we leave to visit the mouse!
It’s daunting at first, but all it takes is a little reading and you’ll understand all of the jargon in no time. Good luck!
Thanks! I love how you get so many pics of the park w/out people. I know you stay late in the night, but how do you get early morning ones? If Ihave an 8am breakfast reservation, how early will they let me in for it. I’d love to be in by 7:30 to take pics on my way to Crystal Palace.
Thanks so much for this post. I want to step up my photography so I am considering the Nikon D7100/ D7000 based on your review in hopes that I will grow into the camera. Do you think it is best to purchase the body only and purchase one of the lenses you recommend to replace the standard lens kit?
Yeah, purchase the body only. The kit lens is okay, but there are far better options. If you’re going to spend that much on a body, you should buy one of the upgraded lenses to get the most out of it. A great option is the Tamron 17-50mm.
That is exactly the one I had my eye on. Thanks so much! Love your blog. I’m trying to get through the whole thing before taking my daughter to WDW for the first time in April. 🙂
I love this post! Thanks so much for all of your advice. As far as your conclusion recommendations…what flash would you recommend for a canon eos t3i? Thanks so much!
Tom,
Love the site! I’m getting ready to head to Disney World for a five month stay (doing the Disney College Program) and I’m a huge photography junkie. At home, I usually only shoot concerts and sporting events, so this will be a different style of shooting for me.
Right now, I’m using a D3100 with 18-55 and 55-200 lenses. I’ve grown to shooting “light” since I’m constantly moving around (quickly) to new positions and can’t afford to be lugging stuff with me. Right now, my bag is a Lowepro Passport Sling (http://www.amazon.com/camera-photo/dp/B0039NLS3I), which holds my camera with either lens attached plus room for the other lens in storage but not much else (it also holds an extra battery and extra memory card, and can fit an external flash if I bought one, but thats it).
I know I’m going to buy a tripod and the TW-282 remote you recommend, but is there a good way to carry my tripod, short of buying a new bag? I had tried the AW202 before getting the Passport Sling, but it just didn’t feel right on my back, for lack of a better description. If I need to get a new bag, would you have any other suggestions besides the AW202?
Thanks in advance for your suggestions!
-Jordan
P.S. There is a group of almost 100 of us doing the Disney College Program in the fall who made a Facebook group for us to talk photography, and a bunch of us really like your posts. If/when you’ll be there in the fall (the majority of us will be there starting in mid-August and leaving in January (but some are there now)) and would be willing to take some college students around the parks for an afternoon on a photography adventure, I know that we’d love it. Feel free to come check out our group and say hi! https://www.facebook.com/groups/DCPphotography/
Hate to be the bearer of bad news, but the best way to carry the tripod is going to be a new bag–or carrying it in its case in addition to your current bag. The latter option is far from ideal.
Thanks for the heads up about that group. I joined it and posted a message!